You can use custom fields to capture specific information from a visitor that is not included as standard on the WiFi registration form. You can preconfigure the fields so the visitor can choose which option is relevant to them, this ensures the data you capture is accurate and consistent. You can set a scope level so you can use the same custom fields across multiple customers or venues.
You can also add custom free text fields to the registration form, however these are specific to each form.
The following custom field types are available:
-
Boolean - This is a single check box field.
-
Single choice - This presents the visitor with a drop-down list of options and the visitor can only select one option.
-
Multiple choice - This presents the options to the visitor as a list of check boxes and the visitor can select multiple options.
The data you obtain from any custom field is stored within CRM for that visitor.
You can also use single and multiple choice custom fields within LogicFlow and visit based E-shots to filter the visitors, providing the custom fields exist at the same scope or below.
Add custom fields
-
Click Onboarding > Custom fields > Create new.
-
Complete Create a new custom field as follows:

Name
This is the label to identify the field when you add it to a form or e-shot. This is not the label which is shown to the visitor.
Type
Single choice
Provides visitors with a drop-down list of predefined options to choose from. There is no limit to the number of options, however a visitor can only select one option. For example:

Multiple choice
Provides visitors with a check box list of pre-defined options to select from. There is no limit on the number of options you can add, visitors can select more than one option. For example:

Boolean
A single check box. For example:

Ownership scope
Choose which scope owns the custom field. This determines where you can access the custom field, for example, if you want to be able to access the field at all venues under one customer, choose Customer.
Owned by
Choose which, customer, group or venue owns the custom field.
-
Click Create custom field, in the Field label add a description, this is what appears on the form to the visitor.
-
For single and multiple choice fields add the Option text, this is what appears to visitors for each check box or drop-down item and click Add option. Repeat this for each option you want to add.
You can now add the custom field to a registration form or use it in an e-shot.
Add custom fields to a registration form - standard
-
Click Onboarding > Splash pages and select the required splash page.
-
Click the edit button on Form to open the Form Settings.

-
Scroll to the bottom, click Add custom field and choose one of the following:
-
Text - This is a free text field specific to this form only, you can apply validation from the following:
-
Text - text only content
-
Number - numerical values only
-
Alphanumeric - text and numbers
-
CPF (Cadastro de Pessoas Físicas) - Tax identification number for Brazil
-
DNI (Documento Nacional de Identidad (Perú)) - Tax identification number for Peru
-
NIT (Número de Identificación Tributaria) - Tax identification number in Mexico
-
RUT (Rol Único Tributario) - Tax identification number for Chile
-
- Selection - Use this option to choose a Single choice (drop-down list) or Multiple choice (check boxes) custom field.
-
Boolean - Use this option to choose a Boolean (check box) custom field.
-
Text - This is a free text field specific to this form only, you can apply validation from the following:
-
Click Save to update the form and to save the splash page with the changes to the form, click Save again. You must ensure this splash page is part of an Access journey.
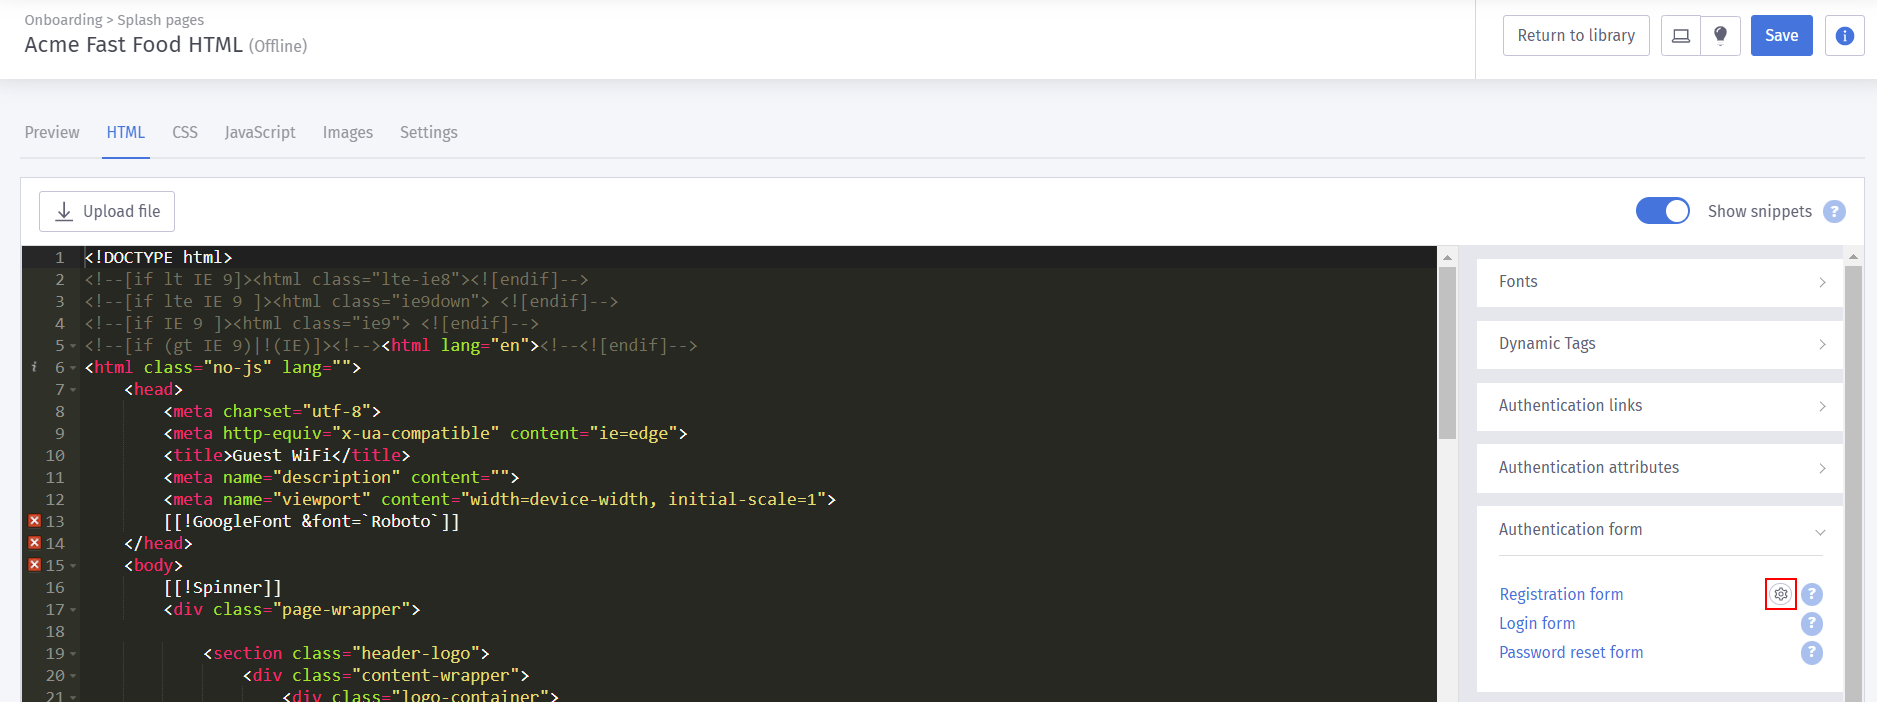
Add custom fields to a registration form - HTML
-
Click Onboarding > Splash pages and select the required splash page.
-
Click the HTML tab, ensure snippets are on and within the Authentication form drop-down, click the cog button on Registration form.

-
Scroll to the bottom, click Add custom field and choose one of the following:
-
Text - This is a free text field specific to this form only, you can apply validation from the following:
-
Text - text only content
-
Number - numerical values only
-
Alphanumeric - text and numbers
-
CPF (Cadastro de Pessoas Físicas) - Tax identification number for Brazil
-
DNI (Documento Nacional de Identidad (Perú)) - Tax identification number for Peru
-
NIT (Número de Identificación Tributaria) - Tax identification number in Mexico
-
RUT (Rol Único Tributario) - Tax identification number for Chile
-
- Selection - Use this option to choose a Single choice (drop-down list) or Multiple choice (check boxes) custom field.
-
Boolean - Use this option to choose a Boolean (check box) custom field.
-
Text - This is a free text field specific to this form only, you can apply validation from the following:
-
You can click the Registration form text to add this snippet to your splash page if it is not already a login option. For more information about HTML snippets, refer to Snippets.
-
Click Save to update the form and to save the splash page with the changes to the form, click Save again. You must ensure this splash page is part of an Access journey.
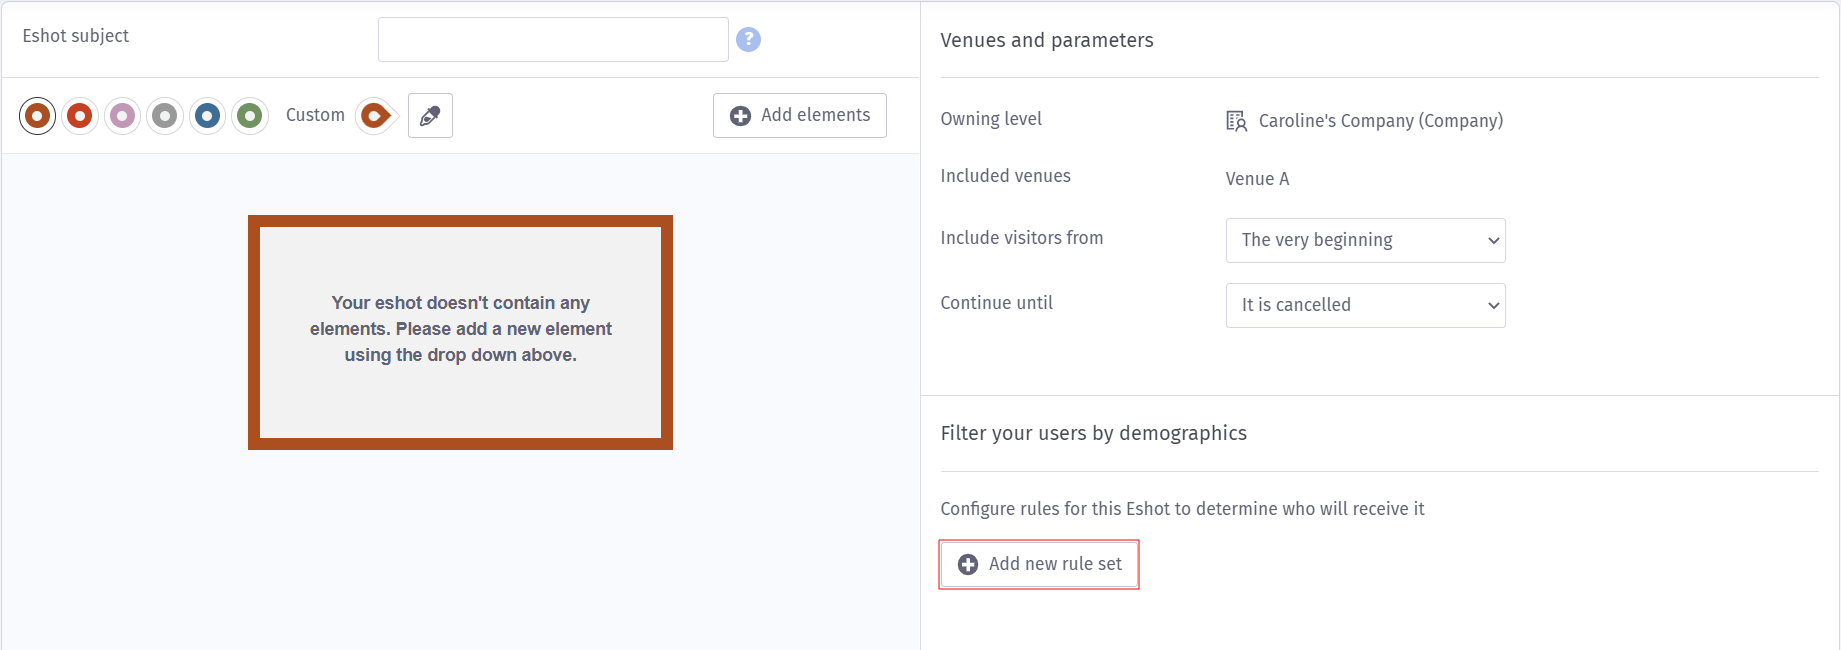
Filter by custom fields in e-shots
Note: This is only available within visit based e-shots.
- Click Marketing > Communications and select the required visit based e-shot.
-
Within Filter your users by demographics click Add a new rule set.

-
In the drop-down choose the custom field, choose is or is not and choose the option you want to filter by.
You can add as many rules as you require, you use the 'and' rule to group multiple rules together or add another rule set to create an 'or' rule.
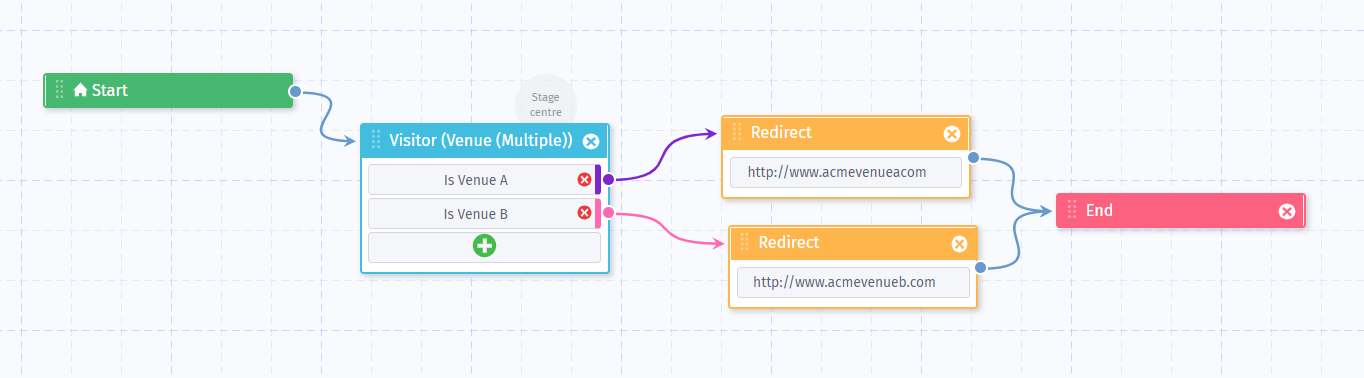
LogicFlow and custom fields
You can use custom field decision nodes on interstitial and online logic flows. The custom fields appear within the Visitor decisions.
 Free Guest WiFi
 Purple App
 SecurePass
 Splash Access